8 Steps to Doing a Burpee

If you can’t do a burpee, don’t worry, you are definitely not alone. But by breaking it down into smaller, more manageable steps, we can work our way up to performing this excellent exercise that works your entire body.

This is how to do a basic burpee.
- Stand with your feet hip-width apart, with your entire body weight aligned over your heels, and your arms hanging loosely by your sides.
- Drive your hips back (like you are about to sit on a chair), bend your knees, and lower your body into a (nearly) full squat.
- Plant your hands on the floor, right in front of your feet and shift your weight onto your hands.
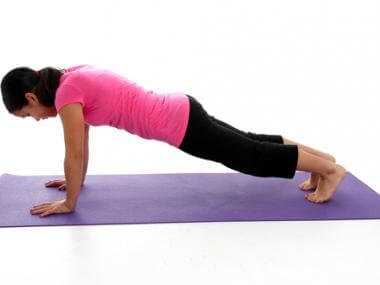
- Hop your feet back to softly land on the balls of your feet in a plank position.
- Do one push-up.
- Hop your feet back up to your hands and shift your weight onto your feet.
- Stand up while reaching your arms over your head and then jump up into the air.
- Land softly and immediately start the movement again from the beginning.
For some of you out there, that sounds doable. For some of you, that sounds a lot like how you start your day. But for some of us, that sounds pretty darn daunting, to say the least.
But seeing as a burpee is one of the best full body exercises that you can do anywhere without a single piece of equipment, I think it is well worth your time to learn how to do one.
So, like eating the proverbial elephant, let’s break this down into manageable chunks. But don’t try to get through all these steps in one day, week, or perhaps even month. Some steps may take longer than others. Make sure you have perfected each step before you move on to the next one.
Step 1: Use a bench or chair.
If your first limitation is that you can’t get all the way down into a squat with your hands on the floor, let’s start by placing your hands on a chair or bench instead. So, instead of getting all the way down into a full squat to start the burpee, only go as low as you are comfortable with and work from there.
Just make sure whatever it is that you are putting your hands on is stable and won’t slip or slide.
Step 2: Step your feet out instead of hopping.
Once your hands are safely planted on a chair, bench (or the floor), the idea of hopping your feet out into a plank position may seem impossible. No problem, simply work on gently stepping them out, one by one, into the plank position and then back under you. You can even practice this one stepping in and out movement for a while before you combine it with Step 1.
If this bothers or causes pain in your wrists or forearms, you can try planting your fists instead of your palms. Keep in mind that this will make the push-up portion less stable but until your wrists are stronger, this is a viable option.
Step 3: Start adding in some hops.
Once you have gotten stronger and more confident in getting in and out of the plank position, it is time to try adding in the hop. Try hopping one direction and stepping the other. Hopping in one direction will likely feel easier than the other. Focus on building the number of hops versus steps that you can do comfortably in either direction.
Step 4: Practice doing a push-up.
This easily could have been labelled Step 1a for those folks out there who are not able to do a push-up at all. This process can take time but likely not as long as you think, and it is well worth it. Take a look at the article called Go From Push-up Zero to Push-up Hero for some help with this step.
As I mentioned in that article, I am not as big of a fan of knee push-ups as I am of a raised push-up, which is perfect for our current needs. Your hands are already planted on a raised surface so there is no need to modify the push-up any farther. Hooray!
Step 5: Add the pushup to mix.
Let’s string this together now: squat down, put your fists on the bench, hop or step out into a plank position, do a push-up, hop or step into a squat position, stand up and raise your hands over your head. Rest for a second and try it again.
Step 6: Add a jump at the end.
Now, let’s add the jump. Do the same sequence you did in Step 6 but this time, launch yourself into a jump with your hands over your head at the end of the burpee. Once again, feel free to take a second to reset before you do another one. Doing them quickly and in rapid succession is our goal but we’re not there yet.
Step 7: Again with your hands on the floor.
The next step is to take this whole party down to the floor. This means that your squat will need to be lower and your push-up will need to be stronger. But it also means that hopping your feet out and back in will be slightly easier and there won’t be any worry of the bench or chair sliding away from you. So it is a 50/50 split of harder to easier.
Step 8: Pick up the pace.
This is really the icing on the cake. Once you have the movement well under control, you can start to increase the reps and speed. But keep in mind that because this is such a great full-body exercise, don’t be surprised if you can’t string too many of them together at first without what my coach used to call “busting a gut.” You will get there. For now, concentrate on maintaining good form over doing more reps or picking up the pace. And since you know how to modify each portion of this exercise, feel free to fall back on those modifications if you feel unsafe or like it may be too effective of a workout.
Stay safe and you will be burping for years to come. Is that the right term? I think so.
For more info, tips, and to join the conversation, head over to Facebook.com/GetFitGuy, twitter.com/getfitguy or BrockArmstrong.com. Also don’t forget to subscribe to the Get-Fit Guy podcast on Apple Podcasts, Stitcher, Spotify, Google Play or via RSSopens XML file .


About the Author

Brock Armstrong was the host of the Get-Fit Guy podcast between 2017 and 2021. He is a certified AFLCA Group Fitness Leader with a designation in Portable Equipment, NCCP and CAC Triathlon Coach, and a TnT certified run coach. He is also on the board of advisors for the Primal Health Coach Institute and a guest faculty member of the Human Potential Institute.